
Marvelous Marshmallow Bridges
**Brief Description:** In this fun science experiment, we’re going to build bridges using marshmallows and toothpicks. This activity will help us learn how real bridges are designed and what makes them so strong. Plus, we’ll find out how to create the strongest bridge we can using only marshmallows and toothpicks!
Learning Objectives and Scientific Principles:
- **Structural Engineering:** By building bridges, we’ll learn how engineers design structures to be strong and stable.
- **Physics and Forces:** We’ll understand how forces like gravity and tension can affect our marshmallow bridges.
- **Geometry:** Through this activity, we’ll explore how different shapes – like triangles – can add strength to structures.

**Materials Needed:**
- Marshmallows (Small or Large)
- Toothpicks
- Ruler or Tape Measure
- Books or Boxes (to serve as bases of the bridge)
- Weights (like coins or small toys to test the strength of the bridge)
**Difficulty Rating:**
**Obtaining Equipment:** 1 out of 5. All of these materials are very easy to find, most likely you already have them at home!
**Completing the Experiment:** 3 out of 5. It might take a bit of practice to get your bridge strong and stable, but keep trying!
Detailed Instructions:
**Step 1: Gather Your Materials**: Make sure you have everything you need:
**Step 2: Set Up Your Work Area**
Clear a space on a table or desk where you can build your bridge. Place a book or a box on each side. This will be where your bridge starts and ends.
**Step 3: Start Your Bridge**
To start your bridge, take a marshmallow and push a toothpick into it. Then, push the other end of the toothpick into another marshmallow. You have now made your first connection! It should look like a little marshmallow dumbbell.
**Step 4: Build Your Base**
Repeat Step 3 to make more connections. Arrange them side by side until they stretch across the gap between your books or boxes. This is the base of your bridge!
**Step 5: Build Upwards**
Now, we will make the bridge taller. Stick a toothpick into the top of a marshmallow on your base, then attach another marshmallow on top. Repeat this along your whole bridge. It should now be two marshmallows tall!
**Step 6: Add Stability with Triangles**
Triangles are very strong shapes. To add strength to your bridge, try making triangles. Stick a toothpick into the top of the second layer marshmallow, but angle it towards the first layer marshmallow next to it. Connect these two marshmallows with another toothpick. It should look like a triangle. Repeat this along your whole bridge.
**Step 7: Measure Your Bridge**
Use your ruler or tape measure to see how long and tall your bridge is. Write these measurements down so you can remember them.
**Step 8: Test Your Bridge**
Now, the fun part! Slowly start placing your weights (coins or toys) onto the middle of your bridge. Keep adding weights until your bridge breaks or bends a lot.
**Step 9: Analyze Your Results**
How much weight could your bridge hold? Could you relate this to how you built it? Did the triangles help? Write down your observations.
**Step 10: Try, Try Again!**
Now that you know more about what makes a strong bridge, try the experiment again. Can you build a stronger bridge next time?
Remember, it’s okay if your bridge doesn’t work perfectly the first time – real engineers try things many times to learn what works best! The most important thing is to have fun and keep trying.
Simple Explanation:
When you’re building your marshmallow bridge, you’re acting just like a real engineer! Engineers use shapes and materials to make things strong and stable. You might notice that when you use a triangle shape with your marshmallows and toothpicks, your bridge seems stronger. That’s because triangles are a very strong shape! They spread out the weight across the whole bridge better than some other shapes, so your bridge can hold more toys or coins before it breaks. This is just like how real bridges are built to hold cars and trucks!
Detailed Explanation:
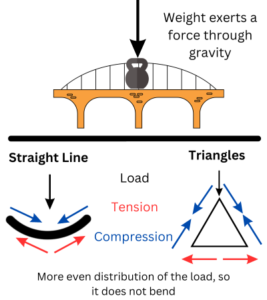
In this experiment, you’re exploring the basic principles of physics and engineering. When you add weight to your bridge, you’re applying a force called ‘load’. Your bridge needs to be strong enough to resist this force. The toothpicks and marshmallows respond to the load through tension (stretching) and compression (squishing).
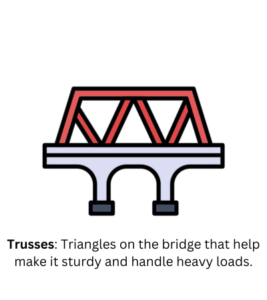
When you create triangles with your marshmallows and toothpicks, you’re using a principle called ‘triangulation’. Triangles are one of the strongest shapes because they distribute weight evenly. That’s why you see them in structures like bridges and towers.
When you add weight to the top of your bridge, the load is transferred through the points of the triangles and down into the supports (the books or boxes). This even distribution of weight helps to keep the bridge stable. If you didn’t use triangles and just built a straight line of marshmallows and toothpicks, the load wouldn’t be evenly distributed, making your bridge much less stable and able to hold less weight.
So, while you’re having fun building and testing your marshmallow bridge, you’re actually learning about the important scientific concepts that real engineers use every day to design structures!